


This post may contain affiliate links, which help to keep Discerning Cyclist rolling. Learn more.
Drying your bicycle before you dry yourself or your clothes might not be seen as a high priority. Unless you’re wearing a sou’wester, or you can slink between the raindrops, you will want to dry yourself first before thinking about your ride.
It definitely makes sense to make sure you are dry and warm but please don’t neglect your machine. Paying attention to ensuring your bicycle is dry is a good way to reduce maintenance and longer term bills and replacing parts over time. You also want to make sure it’s available to ride without seizing up the next time you hop on.

Can Rain Damage Your Bike?
Think about the condition of your car or even your clothes after being caught in the rain. They attract dirt, oil or road-spray even though they might look clean on the surface. The moving parts of your bicycle and its gearing and brakes will be damaged by rain if not handled carefully.

If you commute in the rain, small particles of salt, grit and dust from the road gather together in the drops. These then attach themselves to your bicycle after making contact with it.
If you ride in the countryside, you risk collecting mud and the run-off from fields and meadows. Or other such agricultural detritus. If you ride a mountain bike, fat bike or gravel bike off road, multiply this muck again and again if it’s raining.
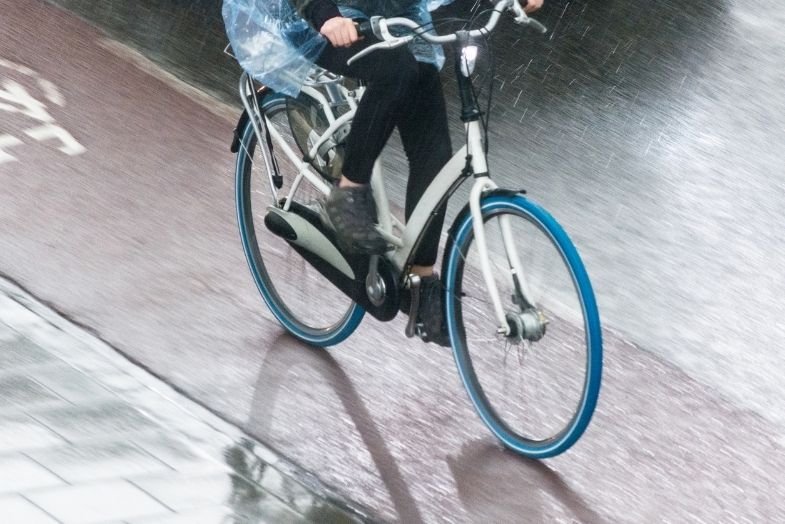
This dust, grit, or sludge will remain attached to your frame and moving parts. Especially parts that have a sticky layer of lubrication already acting like flypaper.
Your chain, brake pads, rims and frame will all hold this dirt if you simply rely on air-drying your ride. If you have steel components on your bicycle, the attraction of the water may also cause low-level rusting. If you leave it too long, you may not be able to remove the rust. And even if you can scrub rust away, you will have affected the performance.
Some parts of your bicycle are deliberately sealed. Parts that rely on lubrication to ensure the smooth running of the machine. Parts which usually turn at between 75 to 110 times per minute.
Riding with mudguards / fenders helps if the roads are wet from rain by channeling it away from most of the moving parts of the bicycle but they cannot protect your chain.
The best type of bicycle that the author can think of for rain-proofing is the Dutch-style which offers mudguards / fenders and a chain guard to help keep the showers away.
Do You Need to Dry Your Bike?
You should be fine after a light shower which darkens the surface of the road and you avoid any puddles that build up. A quick wipe with a towel when you return to base is recommended. Cleaning may or may not be necessary.
Anything like a shower or heavier suggests taking moisture off the rims, brakes and chain at the very least.
If you benefit from a warm enough sun to allow your bicycle to air-dry in less than ten minutes, this would be fine. Don’t just leave your bicycle without checking whether it needs lubrication or not.
If you have a computer or lights that are wet following a ride, then these should be wiped down. Carbon-fibre is resistant to rust but steel is not.
Electric bikes are manufactured in order that they pass safety standards which ensure neither you, pedestrians or other road users are unaffected if your ride is rained on.
Liquids which find their way into the smallest of nooks can be flushed out with repellants.
Best Ways to Dry a Bike
Go grab a leaf-blower. Or move to Death Valley. Or the Australian outback. Can’t do that? Let’s look at some tips instead.
Tip 1 – Make it a Routine
Train yourself to have a routine after each ride. Especially after a wet one in winter. If you can, wash and / or dry your bicycle as soon as you step off it. If it’s safe and you can get out of any lingering rain, you should dry it straight away. If you don’t, it probably won’t dry on its own quickly enough. If the rain persists, it may be a while before you think of going back to it.
Tip 2 – Designated Towels
Don’t mix your towels. Keep one for cleaning your chain. Only use it for that purpose. Keep a soft lint-free towel for your frame and rims. Keep one for your brake pads or disc brakes. If you mix them up you may cause damage to other parts of the bicycle or rub grease in and attract more dirt and grit. Buy a small thin-bristled paint brush for drying hard to reach areas. They will hold water longer if you don’t.
Tip 3 – Dry Chains = Happy Rides
Keep your chain dry. We’ve mentioned before at Discerning Cyclist how a clean and dry chain will give the most efficient ride but penalise you financially if it is in poor running order. A bad chain will affect your crankset and cassette, and you’ll hear it gristling away each time you ride until you buy a replacement.
Tip 4 – Bounce Your Bike!
Bounce your bicycle after drying with a towel or lean it at an angle to help with water displacement. Touch a spot of lubricant where cables enter or exit the frame. Don’t apply lubricant, or grease to your headset, or pedals, or bottom bracket if they are making a noise. It won’t be the cure. And it will leave a film to attract dirt and grit.
Tip 5 – Alcohol is Great
Give your disc rotors or brake pads one pass with some rubbing alcohol. It’s not greasy and will evaporate after getting rid of any oils or lubricant left over from your ride or cleaning procedure.
How to Protect Bike from Rain
Plan ahead and think about your storage environment. Does your place of work have covered storage? Will you be able to take your bicycle inside if not?
Be careful of rain getting into your frame if you need to take your saddle and seatpost off when you lock up your bicycle. Rain that seeps into the seat tube could run into the bottom bracket and cause a seizure or contamination of the grease inside the bearings.
Invest in some polish which can be sprayed on once every half dozen rides or so, depending on use. It will make your upcoming drying routines easier as it will repel water, salt and grit.
Invest in a bike cover. They usually retail for less than £30 / $41 for the best ones that come with ventilation and ties to stop any ‘sail’ effect. They are portable as and when you need them.
Be careful of storage in an unventilated, damp facility. Small sheds are the worst. The damp inside will make it hard for your bicycle to dry quickly and it will retain moisture.
The author was once told by a manufacturer’s approved retailer that his road bike with electronic gears and second-tier groupset should not be ridden between November and March. That’s a sure-fire way to protect it from rain.


